Landscape Lighting Basics: What Every Homeowner Should Know Before Spending a Dollar
You've probably driven through a neighbourhood at night and felt it — that certain quality some homes have after dark. A warmth. A depth. The way a well-lit property looks settled and cared for, while the house next door just disappears into the dark.
You want that for your home. But when you start looking into it, landscape lighting gets confusing fast. There are fixture types you've never heard of, contractors quoting wildly different prices, and online reviews that don't quite help you make sense of any of it.
Here's what you actually need to know — no sales pitch, no jargon, no pressure.
The Goal Isn't More Light. It's the Right Light.
This is the most important thing to understand before you buy a single fixture or call a single contractor.
A lot of homeowners approach landscape lighting thinking about brightness. More lumens, more coverage, more fixtures. But the homes that look genuinely beautiful at night aren't necessarily the brightest ones — they're the most intentional ones.
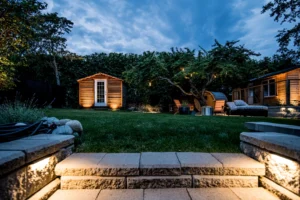
Great landscape lighting uses a combination of light and shadow to make your property look its best. Darkness is part of the design. A few well-placed fixtures highlighting the right features will always outperform a yard that's uniformly flooded with light.
Keep that in mind as you read through the rest of this guide.
What Are the Different Types of Landscape Lighting?
Before you can make good decisions, it helps to know what you're choosing between. Here are the main types and what each one does:
Path Lighting sits low to the ground and illuminates walkways, garden borders, and driveways. It's the most practical type — keeping people from tripping in the dark — but done well, it also creates a sense of arrival and welcome. Path lights cast light downward, so they guide without glaring.
Uplighting places fixtures at ground level aimed upward, usually toward a tree, the face of your home, or an architectural feature. It's one of the most dramatic effects in outdoor lighting. A mature tree uplit from below becomes a focal point. A stone facade takes on a completely different character.
Downlighting (sometimes called moonlighting) does the opposite — fixtures are placed high up, often in trees or on structures, casting soft light down through foliage. The effect is natural and subtle, like genuine moonlight. It's one of the most beautiful techniques in landscape lighting and one of the most underused.
Accent and Spot Lighting draws attention to specific details: a garden sculpture, a water feature, an interesting plant specimen. These are the finishing touches that make a lighting design feel curated rather than generic.
Wall Washing grazes light across a vertical surface — a fence, a stone wall, a garden bed edge — to reveal texture and create depth. It adds dimension that flat light can't achieve.
Flood Lighting covers larger open areas with broader, more diffuse light. Useful for patios, wide driveways, and open lawn areas where you want functional coverage without the precision of spotlighting.
Most well-designed residential systems use several of these types together. That layering — light at different heights, serving different purposes — is what creates the richness you notice in professionally lit properties.
What Is Low-Voltage Lighting, and Why Does It Matter?
Almost all residential landscape lighting today runs on low-voltage systems (12V), and if a contractor recommends otherwise for a standard home installation, that's worth questioning.
Low-voltage systems step down your home's standard current through a transformer, then run cable out to fixtures throughout your yard. The advantages are significant: they're safer to work around, far more energy-efficient, easier to expand or change over time, and generally more affordable to install.
The alternative — line voltage (120V) — is still used in some commercial settings and for specific high-output applications, but for a typical home, it's unnecessary.
When you're getting quotes, ask what voltage system the contractor uses. Most reputable residential installers will say low-voltage without hesitation.
Does the Brand of Fixture Really Matter?
Yes — more than most homeowners realize. And this is where a lot of people get burned.
Outdoor fixtures live in a demanding environment. Rain, snow, UV exposure, temperature swings, insects, curious wildlife, and the occasional lawnmower are all part of the reality. The gap between a quality fixture and a cheap one often doesn't show up at installation — it shows up three winters later when things start corroding, failing, or simply looking terrible.
Here's what to pay attention to:
Material. Solid brass and copper are the gold standard. They're corrosion-resistant, hold up in harsh climates, and actually develop a more attractive appearance over time. Cast aluminum is a reasonable middle ground. Thin stamped metal or plastic fixtures might look fine in the store — they won't look fine in five years.
IP Rating. This is a standardized measure of how well a fixture is sealed against dust and moisture. Look for IP65 or higher for anything installed near the ground or in a wet area. A contractor who can't tell you the IP rating of the fixtures they're installing is a red flag.
LED vs. Halogen. If anyone is still quoting you halogen fixtures, keep looking. LED bulbs last 25,000–50,000 hours, use a fraction of the energy, and produce almost no heat. Halogen technology is older, costlier to run, and not worth the tradeoff in any residential application.
Warranty. Quality fixture manufacturers back their products with meaningful warranties — five years or more is a reasonable expectation at the higher end. A short warranty or no warranty is a manufacturer telling you something about how much they trust their own product.
What Colour of Light Should You Choose?
Light colour is measured in Kelvins (K). It describes the tone of the light — how warm or cool it appears — and it matters more than most people expect.
2700K–3000K (warm white) produces a soft, amber-toned glow. This is the most popular range for residential landscape lighting, and for good reason. It feels inviting, it flatters natural materials like stone and wood, and it complements most home exteriors. When in doubt, this is where to land.
3500K–4000K (neutral white) is cleaner and crisper. It works well for contemporary or modern homes and for areas where you want visual clarity — a garage approach, a wide driveway, a functional work area.
5000K+ (daylight/cool white) veers into blue-toned territory. It looks institutional rather than residential, and it's rarely a good fit for home landscapes. If you're seeing very white or slightly blue light in someone's yard at night, this is probably why.
Ask your installer to specify the colour temperature of every fixture they're proposing. It's a detail that's easy to get wrong and expensive to fix after the fact.
How Should You Actually Think About Designing Your Lighting?
You don't need a design degree to think through this intelligently. A few principles go a long way:
Highlight what matters, let the rest recede. Not everything in your yard needs to be lit. Identify the two or three features that define your property — the front of your home, a mature tree, a garden you're proud of — and build the design around those. Restraint is a feature, not a limitation.
Think in layers. Path lighting alone looks flat. Uplighting alone looks theatrical. A combination of types at different heights creates depth and interest. If a proposal only includes one type of fixture, ask why.
Consider light pollution. Fixtures that throw light upward into the sky, into your neighbours' windows, or across the street are wasteful and inconsiderate. Good design directs light precisely where it's needed and shields it from everywhere else.
Look from the inside too. Your landscape lighting isn't only for people outdoors — it's also what you see every evening when you look out your windows. Think about that view.
Plan around growth. Trees and shrubs grow. A fixture positioned perfectly today might be blocked or overgrown in three years. Experienced installers think about this upfront and position fixtures to account for where things will be, not just where they are now.
What Does a Good Professional Installation Actually Look Like?
If you're going to hire someone, knowing what the process should look like helps you evaluate who's worth hiring.
A legitimate installation starts with a real site visit and design conversation — not a five-minute quote. The installer should walk your property with you, ask questions about how you use your outdoor spaces, discuss which features you want to highlight, and explain their reasoning. If someone shows up, walks around for two minutes, and hands you a number on a piece of paper, that's not a design process.
The installation itself involves running cable (usually underground), setting fixtures, installing and programming a transformer, and then — importantly — adjusting everything after dark. Fixture placement and aiming is something you can only really evaluate at night, in actual conditions. Any installer who doesn't do a nighttime walkthrough and adjustment isn't finishing the job properly.
After installation, ask about ongoing maintenance. Plants grow around fixtures. Connections can work loose. Even long-lasting LEDs eventually need replacing. A company that offers a service program is thinking about your experience over time, not just the day of installation.
Questions Worth Asking Before You Hire Anyone
You have every right to ask these, and a good contractor will welcome them:
- What are your fixtures made of, and who manufactures them?
- Are your systems low-voltage LED?
- Do you provide a design consultation, or just a quote?
- Will you adjust fixture placement after dark, once installed?
- What does your warranty cover, and for how long?
- Do you offer ongoing maintenance or service visits?
- Can I see examples of your work — ideally at night?
The answers tell you a lot. Contractors who are proud of their work and confident in their products answer these questions easily. Those who aren't tend to get vague.
Should You DIY Your Landscape Lighting?
Honestly? It depends on what you're trying to accomplish.
Low-voltage landscape lighting is one of the more approachable DIY home improvement projects. Hardware stores and online retailers carry a wide range of kits, and if you're patient and willing to learn, a small installation is achievable.
The tradeoffs are real, though. Consumer-grade DIY kits typically use lower-quality fixtures that won't last as long, and the results — while they might look decent at first — rarely match what a professional with access to commercial-grade products can achieve. The design knowledge gap is also significant: knowing where and how to position fixtures for the best effect takes experience that's hard to shortcut.
For a simple pathway or a few accent lights as a first project? DIY can make sense. For a comprehensive plan that covers your whole property and is meant to last? Most homeowners find that professional installation pays for itself in how good it looks and how long it holds up.
The Bottom Line
The homeowners who end up happiest with their landscape lighting are the ones who approached the process as informed buyers. They knew what questions to ask, what materials to look for, and what a credible installation process actually involves.
That knowledge doesn't make the decision for you — but it puts you in control of it. And that's where you should be.
If you've got questions that this article didn't answer, that's exactly the kind of thing we write about. We'd rather you understand your options fully than make a fast decision you'll second-guess later.